
You’re sitting at your computer, AirPods in hand, wondering why they won’t connect to your Windows PC. Sound familiar?
Here’s the thing: AirPods were built for Apple devices. But that doesn’t mean you can’t use them with Windows. You just need to know the right steps.
I’ve been there. The frustration of clicking through menus, holding buttons, and still seeing nothing happen. The good news? Once you know what works, it’s pretty straightforward.
In this guide, I’ll walk you through the exact steps to connect any AirPods model to Windows. I’ll show you why your connection keeps failing and share troubleshooting fixes that work. You’ll also learn how to manage your connection going forward.
No technical jargon. No complicated workarounds. Just clear instructions that get your AirPods working with your PC.
Ready to fix this once and for all? Let’s get started.
The Complete Connection Process
Let me walk you through the exact steps that work. I’ve tested this process dozens of times, and it works when you follow each step carefully.
Here’s what we’re going to do:
1: Preparing Your AirPods
First things first. Put both AirPods in their case.
Close the lid and wait 5 seconds. This resets any existing connections. Think of it as giving your AirPods a quick nap.
Now open the case. Keep the AirPods inside. Don’t take them out yet.
Look at the back of your case. See that small circular button? That’s your setup button. You’ll need this in a moment.
2: Windows Bluetooth Setup
Time to get Windows ready. The steps are slightly different depending on your version.
For Windows 10:
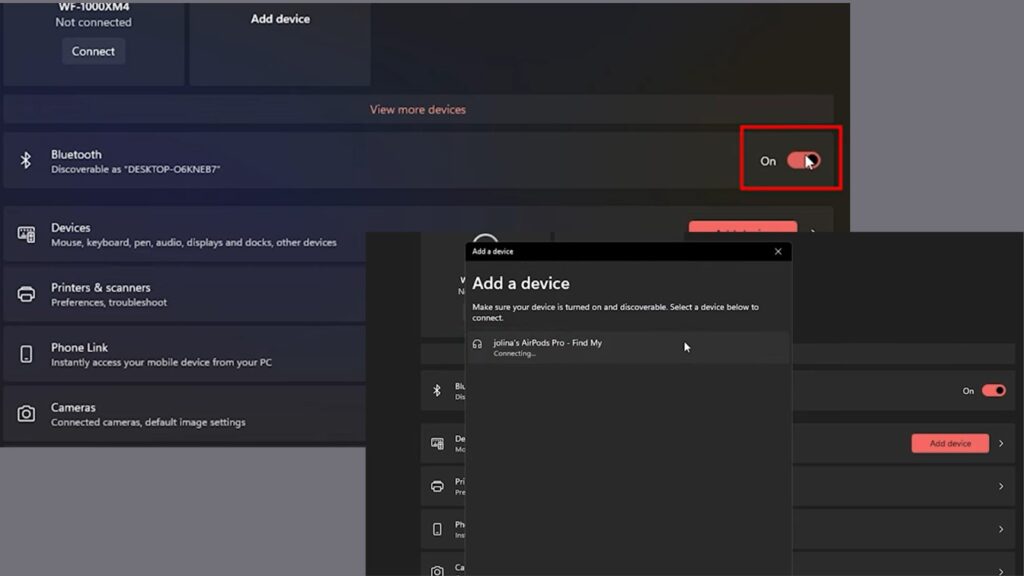
Press the Windows key + I to open Settings. Click on “Devices.” You’ll see “Bluetooth & other devices” on the left side.
Make sure the Bluetooth toggle is turned on. If it’s gray, click it to turn it blue.
Click “Add Bluetooth or other device.” Choose “Bluetooth” from the pop-up menu.
For Windows 11:
Open Settings the same way (Windows key + I). This time, click “Bluetooth & devices” right on the main page.
Check that Bluetooth is enabled. Look for the big blue “Add device” button and click it.
Select “Bluetooth” from the options.
3: Activating Pairing Mode
Here’s where most people mess up.
Press and hold the setup button on the back of your case. Don’t just press it. Hold it down.
Keep holding for 3 to 10 seconds. Yes, it feels like forever. Trust the process.
Watch the LED light inside your case. Wait until it starts flashing white. Not steady white. Flashing white.
Keep your case open the entire time. Don’t close it yet.
4: Completing the Connection
Look back at your Windows screen. Your AirPods should appear in the device list.
But here’s the thing: They might show up as “Headphones” first. That’s normal. After a few seconds, they’ll change to “AirPods” or “AirPods Pro.”
Click on them when you see them.
Windows will think for a moment. Then you’ll see a message: “Your device is ready to go!”
That’s it. Your AirPods are now connected to your Windows PC.
Take them out of the case and put them in your ears. You should hear audio from your computer right away.
When Things Go Wrong – Troubleshooting Guide
Don’t worry. Connection problems happen to everyone. I’ll help you fix the most common issues step by step.
Let’s tackle these problems one by one.
AirPods Not Appearing in Device List
This is the most frustrating problem. Your AirPods seem invisible to Windows.
First, try resetting your AirPods completely.
Put them in the case and close the lid. Hold that setup button for a full 15 seconds this time. You’ll see the light turn amber, then white. That amber light means the reset worked.
Distance matters more than you think. Move your AirPods case closer to your computer. Stay within 2 feet during pairing.
Check for interference. Turn off other Bluetooth devices nearby. Your phone, tablet, or wireless mouse can mess with the connection.
Double-check that white pulsing light. If it’s not flashing white, hold the button longer. Sometimes it takes up to 20 seconds.
Still nothing? Try connecting just one AirPod first. Leave the other in the case.
Connection Drops or Poor Audio Quality
Your AirPods are connected, but now they sound terrible or keep cutting out.
Time to update your Bluetooth drivers.
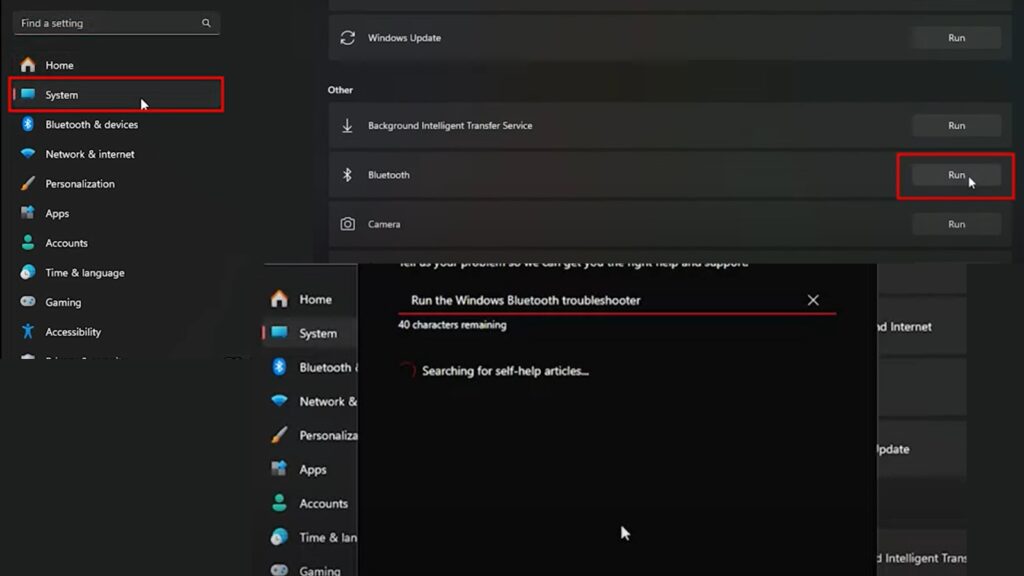
Right-click the Start button. Choose “Device Manager.” Find “Bluetooth” and expand it. Right-click your Bluetooth adapter and select “Update driver.”
Windows has a built-in troubleshooter that works. Press Windows key + R. Type “msdt.exe -id DeviceDiagnostic” and hit Enter. Follow the prompts.
Try the Bluetooth reset trick.
Turn off Bluetooth in Windows. Wait 30 full seconds. Don’t rush this part. Turn it back on and try connecting again.
If nothing else works, remove your AirPods completely. Go to Bluetooth settings, find your AirPods, and click “Remove device.” Then start the pairing process from scratch.
Microphone Issues
Your AirPods sound great, but your voice sounds like you’re talking through a pillow.
Here’s the truth: Bluetooth has limitations. When you use both speakers and a microphone at the same time, the quality drops. It’s not your fault.
Check your Windows microphone settings. Right-click the volume icon in your taskbar. Choose “Open Sound settings.” Scroll down to “Input” and adjust the microphone level.
For important calls, use a different microphone. Your laptop’s built-in mic or a USB headset will sound much better than AirPods on Windows.
The microphone issue isn’t something you can fully fix. It’s just how Bluetooth works with Windows. Your AirPods will sound perfect on an iPhone, but Windows plays by different rules.
Managing Your Connected AirPods
Now that your AirPods are working, let me show you how to manage them properly. This part is easier than the initial setup.
Reconnecting After Disconnection
Your AirPods should reconnect automatically when you take them out of the case. But Windows isn’t as smart as an iPhone.
Sometimes they just won’t reconnect on their own. That’s normal.
When this happens, don’t panic. Go to your Bluetooth settings in Windows. You’ll see your AirPods listed there. Click on them and hit “Connect.”
Here’s a cool trick: You can use your AirPods with both your iPhone and PC without constantly forgetting devices. Just manually connect to whichever device you want to use.
On your iPhone, go to Settings > Bluetooth. Tap your AirPods and connect. On Windows, use the Bluetooth menu to connect. No need to unpair from either device.
The key is manual switching. Automatic switching only works between Apple devices.
Disconnecting and Removing AirPods
There are two ways to stop using your AirPods with Windows. The method you choose depends on what you want to do next.
Temporary disconnect: Use this when you want to use your AirPods with another device right now, but plan to come back to Windows later.
Go to Bluetooth settings. Find your AirPods and click “Disconnect.” They’ll stay paired but won’t play audio from your PC.
Permanent removal: Choose this if you’re done using AirPods with this computer or having ongoing connection problems.
In Bluetooth settings, find your AirPods. Click the three dots or “More options.” Select “Remove device.” This completely unpairs them.
You’ll need to go through the full pairing process again if you want to reconnect later.
When should you remove them completely? If you’re selling your computer, giving it to someone else, or your AirPods keep having connection problems that won’t go away.
If you’re switching to your iPhone temporarily, just disconnect. Don’t remove them.
Getting ready for other devices: Before connecting to a new device, put your AirPods in pairing mode again. Hold that setup button until you see the white flashing light.
Maximizing Performance on Windows
Your AirPods are connected, but let’s make them work even better. Small tweaks can make a big difference.
Audio Settings Optimization
Windows might not automatically choose your AirPods for everything. Let’s fix that.
Make your AirPods the default audio device.
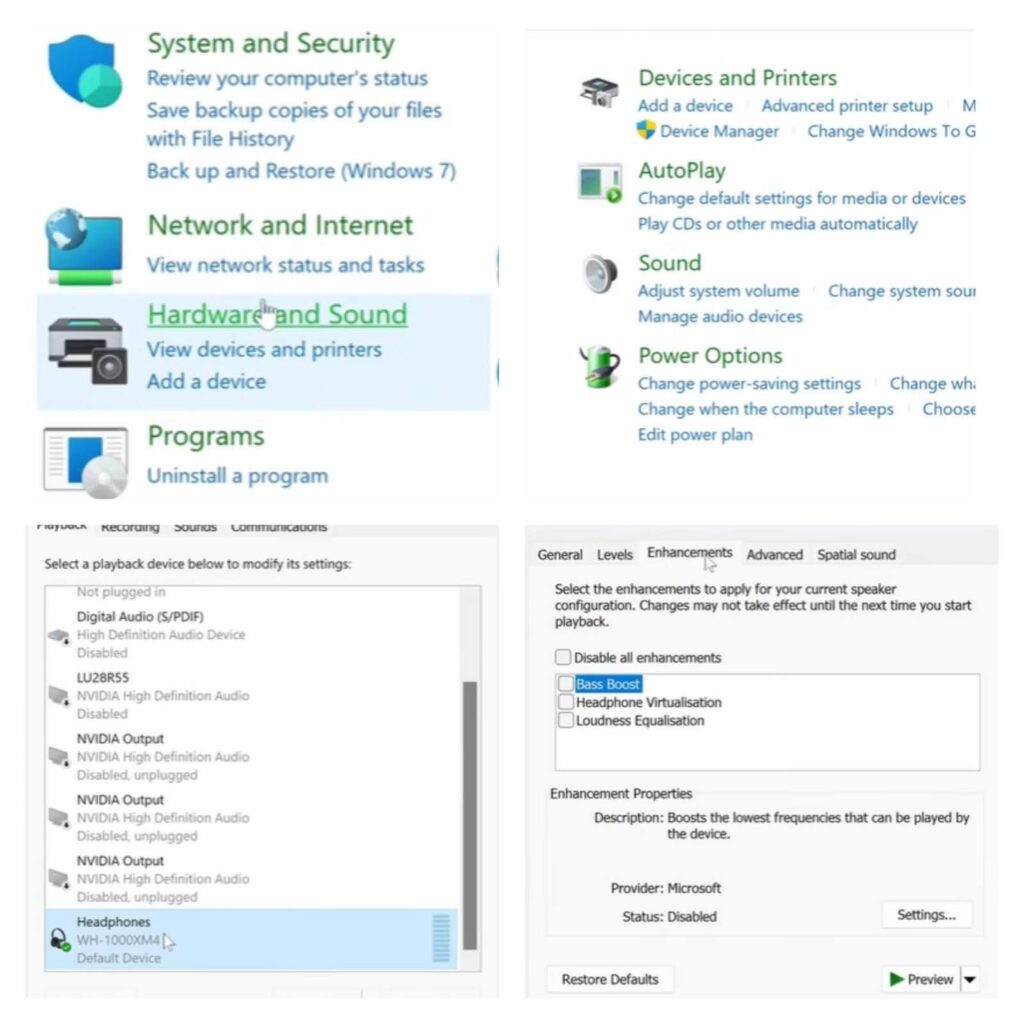
Right-click the volume icon in your taskbar. Choose “Open Sound settings.” Under “Output,” select your AirPods from the dropdown menu.
Do the same thing for “Input” if you plan to use the microphone. But remember, microphone quality won’t be great.
Windows has audio quality settings you can adjust. In the same Sound settings, click “Device properties” under your AirPods.
Try different audio formats. Click “Additional device properties,” then the “Advanced” tab. Test different sample rates. 24-bit, 48000 Hz usually works well.
Volume management is tricky with AirPods on Windows. You have three volume controls: Windows system volume, app volume, and AirPods volume.
Start with Windows at 80%. Adjust individual apps as needed. Don’t max out everything at once. That leads to distortion.
Multi-Device Usage Strategy
Using AirPods with both iPhone and PC takes some planning. But it’s doable.
Here’s my recommended switching method:
When you want to use your iPhone, put your AirPods in your ears. Go to iPhone Settings > Bluetooth. Tap your AirPods to connect.
For Windows, open Bluetooth settings. Click your AirPods and hit “Connect.”
Windows doesn’t know when you’re using your iPhone. So, always manually disconnect from Windows before switching to iPhone. This prevents audio conflicts.
Connection priority is simple: the last device you connected to gets priority. If your AirPods are playing from your iPhone, they won’t automatically switch to Windows when you start a video.
Quick reconnection techniques save time. Pin Bluetooth settings to your taskbar on Windows. On iPhone, add Bluetooth to Control Center for faster access.
Pro tip: When switching devices frequently, don’t close the AirPods case. Just take them out and put them back in your ears. The connection happens faster this way.
If you use your PC more than your iPhone, consider leaving it connected to Windows most of the time. Only switch to an iPhone when you need it.
One warning: Don’t try to connect to both devices simultaneously. Pick one, use it, then switch. Trying to use both at once creates audio chaos.
Conclusion
Getting your AirPods to work with Windows doesn’t have to be a headache. Sure, it’s not as smooth as connecting to an iPhone. But with the right steps, you can get reliable audio from your PC.
Remember the key points: hold that setup button until you see white flashing lights. Keep your case open during pairing. And don’t panic if it takes a few tries.
The most important thing? Be patient with the process. Windows and AirPods speak different languages, but they can still communicate.
If you’re still having trouble after trying these steps, go back to the troubleshooting section. Reset your AirPods completely and start fresh.
Your AirPods should now be working perfectly with your Windows PC. Time to enjoy that wireless freedom you’ve been waiting for.
Frequently Asked Questions
Why won’t my AirPods appear in Windows Bluetooth settings?
Hold the setup button longer (up to 15 seconds) until the white light flashes. Keep the case open throughout the pairing process.
Can I use AirPods with both my iPhone and Windows PC?
Yes, but you’ll need to manually switch between devices. Automatic switching only works between Apple devices.
Why does my AirPods microphone sound bad on Windows calls?
Bluetooth limitations reduce microphone quality on Windows. Consider using a separate microphone for important business calls and meetings.
Do I need special software to connect AirPods to a Windows device?
No special software is needed. Windows’ built-in Bluetooth handles the connection. Just follow the proper pairing steps carefully.
Why do my AirPods keep disconnecting from my Windows PC?
Update your Bluetooth drivers, reset your AirPods completely, or remove interference from other nearby Bluetooth devices that may be causing connection issues.