Starting a Discord server can feel overwhelming, especially when you want to make a great first impression on new members.
One of the most effective ways to create a positive experience is by setting up a dedicated welcome channel that greets newcomers and helps them understand your community.
Learning how to make a welcome channel on Discord is simpler than you might think, and it can transform how people perceive your server from the moment they join.
A well-crafted welcome channel serves as your community’s front door, providing essential information while making members feel valued and included.
In this guide, we’ll walk through everything you need to know about creating an effective welcome channel, from the basic setup process to advanced automation features.
By following these steps, you’ll build a welcoming environment that encourages engagement and helps your Discord community thrive.
What Is a Welcome Channel on Discord?
A welcome channel on Discord is a designated text channel specifically created to greet new members when they join your server.
This channel acts as the first point of contact, providing essential information and helping newcomers feel comfortable in your community.
Purpose of a Welcome Channel
The primary purpose of a welcome channel is to create a smooth onboarding experience for new members.
It serves as an information hub where you can introduce your server’s culture, explain important rules, and guide people on how to get started.
This channel helps reduce confusion and ensures everyone understands what your community is about from day one.
A welcome channel also demonstrates that your server is active and well-organized, which encourages new members to participate rather than leave immediately after joining.
Benefits of Having a Welcome Channel
- Reduces member confusion by providing clear instructions and server information upfront
- Increases member retention as people are more likely to stay when they understand the community
- Saves time for moderators by answering common questions before they’re asked
- Creates a professional appearance that makes your server look established and trustworthy
- Builds community connection by making new members feel acknowledged and welcomed
Examples of Good Welcome Channels
Gaming communities often create welcome channels that introduce their game focus, explain how to find teammates, and share links to game-specific channels.
These channels might include server rules, role assignment instructions, and upcoming event announcements.
Study groups and educational services typically feature welcome channels with course schedules, study resource links, and academic guidelines.
They often include information about how to access different subject channels and connect with study partners.
Creative communities showcase their welcome channels with examples of member artwork, writing guidelines, and feedback processes.
These channels help new creators understand the community standards and find collaboration opportunities.
Step-by-Step Guide to Creating a Welcome Channel
Step 1: Open Your Discord Server Settings
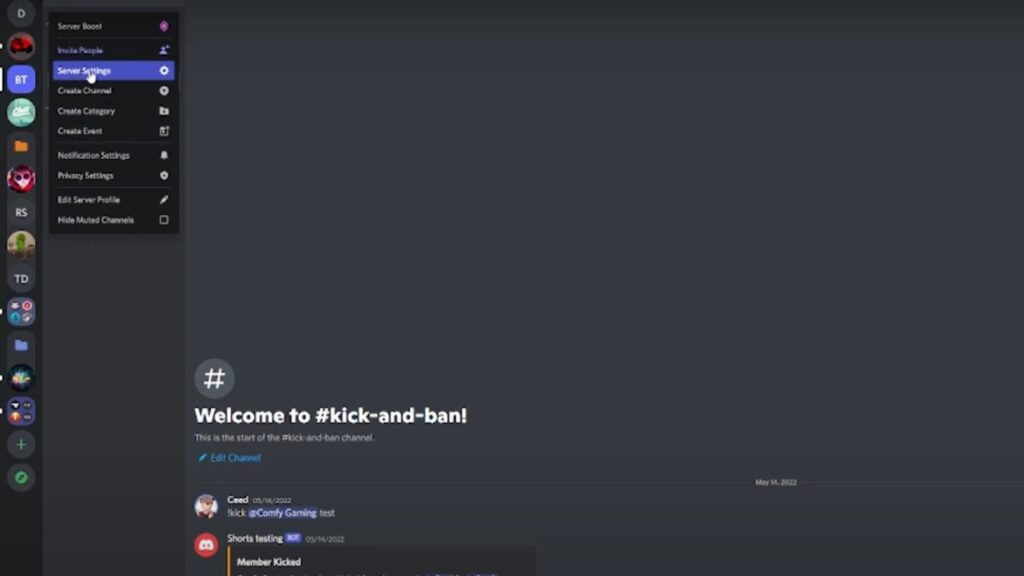
Right-click on your server name at the top of the channel list and select “Server Settings” from the dropdown menu.
You’ll need administrator or “Manage Channels” permissions to access these options and make changes to your server structure.
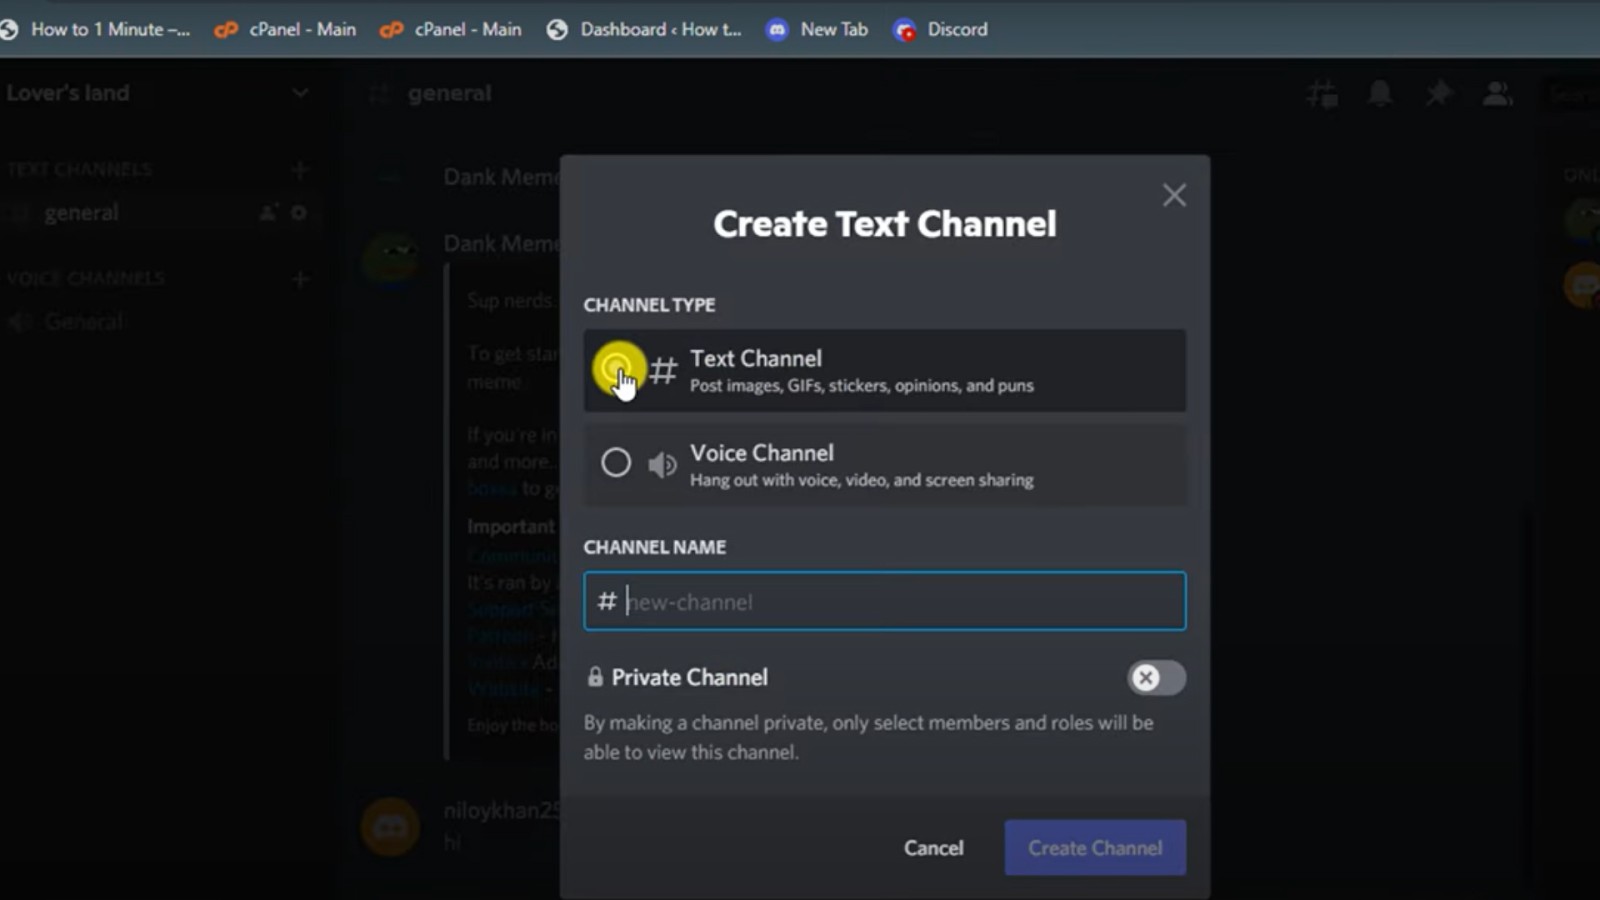
Step 2: Create a New Text Channel
Click the “+” icon next to “Text Channels” in your server’s channel list, or go to the “Channels” section in Server Settings.
Select “Create Channel” and choose “Text Channel” as the channel type to proceed with setup.
Step 3: Name and Categorize the Channel
Enter a clear name like “welcome” or “new-members” in the channel name field, keeping it simple and recognizable.
If you have channel categories set up, place them in an appropriate category like “Information” or create it at the top of your channel list for maximum visibility.
Step 4: Set Permissions (Optional)
Configure channel permissions to control who can send messages – many servers restrict posting to moderators only while allowing everyone to read.
You can also set the channel to be visible to new members immediately upon joining, ensuring they see your welcome message right away.
What to Include in Your Welcome Message?
A Warm Greeting
Start your welcome message with a friendly and enthusiastic greeting that reflects your server’s personality and tone.
Use the member’s name when possible (through bot automation) and express genuine excitement about them joining your community.
Keep the greeting concise but personal, letting new members know they’re valued and that you’re happy to have them as part of the group.
Server Rules and Guidelines
Include the most important server rules directly in your welcome message or provide a clear link to your detailed rules channel.
Focus on essential guidelines like respectful communication, content restrictions, and any specific community standards that members need to know immediately.
Make these rules easy to scan by using bullet points or numbered lists, and consider using emojis to make them more visually appealing and memorable.
How to Get Started or Assign Roles
Provide clear instructions on the first steps new members should take, such as reading specific channels, introducing themselves, or selecting roles.
Explain your role system, if you have one, including how to access different channels or participate in various server activities.
Include any commands or reactions they need to use for role assignment, and mention if there are verification steps required before accessing the full server.
Link to Introductions Channel or FAQ
Direct new members to your introductions channel, where they can share information about themselves and connect with other community members. Also, provide links to frequently asked questions or help channels where they can find additional support.
These links help distribute information effectively and prevent your welcome channel from becoming cluttered while ensuring members can easily find the resources they need.
Common Mistakes to Avoid
Overloading with Information
Many server owners make the mistake of cramming every piece of server information into their welcome message, creating an overwhelming wall of text.
New members often feel intimidated by lengthy messages and may skip reading important details or leave the server entirely.
Keep your welcome message focused on essential information only, and use separate channels or pinned messages for detailed guidelines and additional resources.
Not Using Permissions Correctly
A frequent error is leaving welcome channels open for everyone to post in, which can lead to spam, off-topic conversations, and important messages getting buried.
Some servers also make the opposite mistake by restricting the channel so much that new members can’t even see it.
Set permissions so that only moderators can post messages while all members can read and react, ensuring your welcome information stays visible and organized.
Ignoring Bot Setup Instructions
Server owners often rush through bot configuration without properly testing automated welcome messages or reading the setup documentation thoroughly.
This leads to broken welcome systems, messages that don’t display correctly, or bots that fail to trigger when new members join.
Take time to carefully follow each bot’s specific setup instructions, test the system with alternate accounts, and regularly check that automated features are working as intended.
Conclusion
Creating a welcome channel for your Discord server is one of the smartest investments you can make in building a thriving community.
With just a few simple steps, you can set up a professional greeting system that makes new members feel valued while reducing confusion and questions.
Remember to keep your welcome message clear and focused, use proper permissions to maintain organization, and consider adding bot automation to streamline the process.
Regular updates and testing ensure your welcome system continues working effectively as your server grows.
A well-designed welcome channel sets the foundation for positive member experiences and higher retention rates.
Start implementing these strategies today, and you’ll soon see how much easier it becomes to manage your community while creating lasting connections with new members who feel genuinely welcomed from their very first moment in your server.
Frequently Asked Questions
Can I create a welcome channel without administrator permissions?
No, you need administrator or “Manage Channels” permissions to create new channels and modify server settings for welcome channel setup.
Should I allow everyone to post in the welcome channel?
It’s best to restrict posting to moderators only while allowing all members to read, preventing spam, and keeping information organized.
Do I need a bot to create automated welcome messages?
Bots aren’t required for basic welcome channels, but they enable automatic greetings and advanced features like role assignment upon joining.
How often should I update my welcome channel content?
Review and update your welcome message monthly or whenever you change server rules, add new features, or modify community guidelines.
What’s the ideal length for a welcome message?
Keep welcome messages concise – around 3-5 sentences covering essentials like greeting, key rules, and next steps to avoid overwhelming newcomers.