You’re tired of getting outbuilt and outgunned in Fortnite. Your aim feels sluggish, and your building speed can’t keep up with the competition. Meanwhile, you’ve watched Ninja dominate with lightning-fast builds and pinpoint accuracy.
Here’s the thing it’s not just natural talent. Ninja’s settings give him a real competitive edge. With 15 daily wins and over 14,000 games played, he’s fine-tuned every detail for maximum performance.
I’ll show you his exact configuration: Mouse sensitivity numbers that balance speed and precision. Keybinds that put building controls at your fingertips. Graphics settings that eliminate distractions while maintaining visibility.
I’ve spent years analyzing pro-player setups and helping gamers improve their performance. No guesswork or outdated information – these are Ninja’s current settings with explanations for why each choice matters.
By the end, you’ll have a proven configuration that can improve your aim accuracy and build speed. Let’s get your settings optimized for competitive play.
Mouse Settings for Perfect Aim
Your mouse settings control everything. Get these numbers right, and you’ll notice the difference in your first match.
Core Mouse Configuration
Start with these four essential settings.
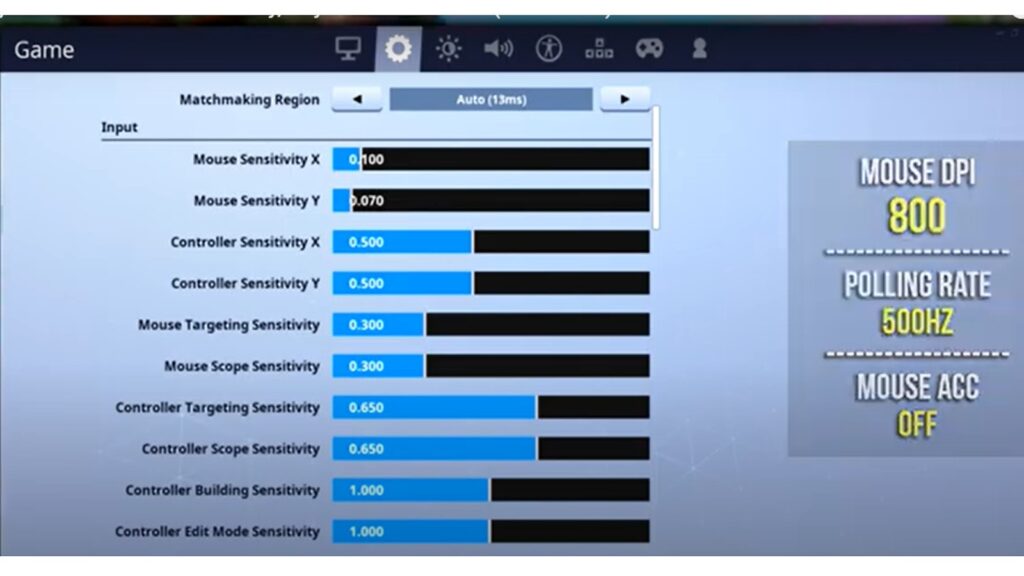
DPI: 800 – Perfect balance between speed and control. A higher DPI feels twitchy. Lower DPI feels sluggish. 800 is the sweet spot.
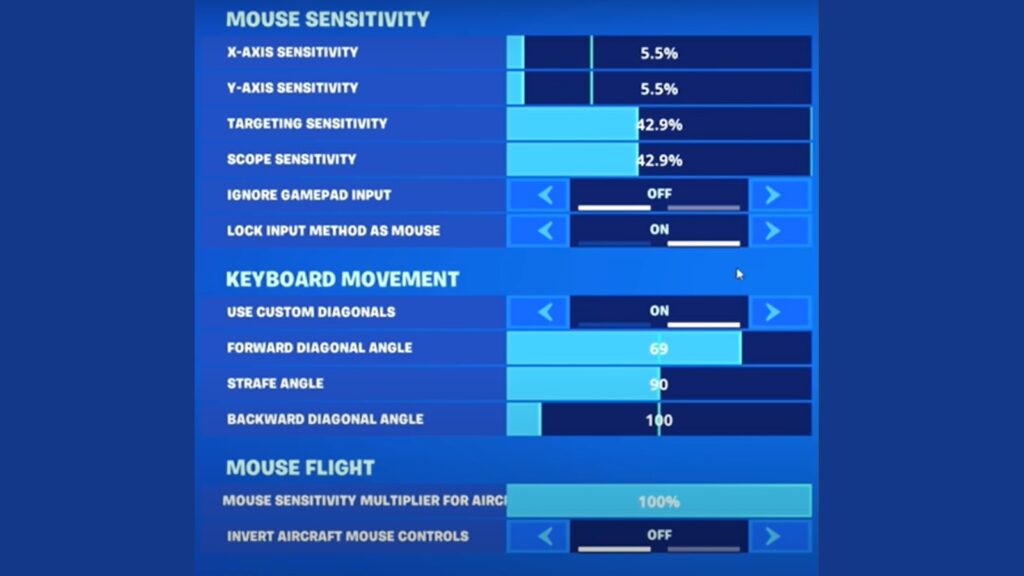
X-Axis Sensitivity: 6.5% – Controls left and right movement. Smooth and controllable without being too slow.
Y-Axis Sensitivity: 6.5% – Vertical movement up and down. Matches the X-axis exactly for a consistent feel in all directions.
Polling Rate: 1000 Hz – How often your mouse reports position. 1000 times per second means zero delay between movement and response.
Specialized Sensitivity Settings
Different situations need different speeds.
Targeting Sensitivity: 26.0% – Higher than base because you’re zoomed in. Need more sensitivity to cover the same visual distance.
Scope Sensitivity: 28.0% – Even higher for sniper rifles. Scoped weapons zoom in more, requiring more mouse movement.
Building Sensitivity: 100.0% – Speed matters more than precision when building. Fast, sweeping movements for quick wall and ramp placement.
Editing Sensitivity: 100.0% – Same as building. When editing structures, you want maximum speed for tile selection and confirmation.
Why These Numbers Work?
The math behind the settings.
eDPI calculation: 800 × 0.065 = 52 eDPI – Most pros use 40-80 eDPI. 52 hits the competitive sweet spot for balanced control.
Consistent muscle memory across all scenarios. Your arm movement feels the same, just covering different distances at different zoom levels.
Think of it like car steering. Same wheel response whether you’re parking or on the highway. These ratios work the same way – one muscle memory for all aiming situations.
Speed-Optimized Keybind Configuration
Keybinds separate good players from great ones. Ninja’s configuration puts every essential action at your fingertips without forcing awkward hand positions.
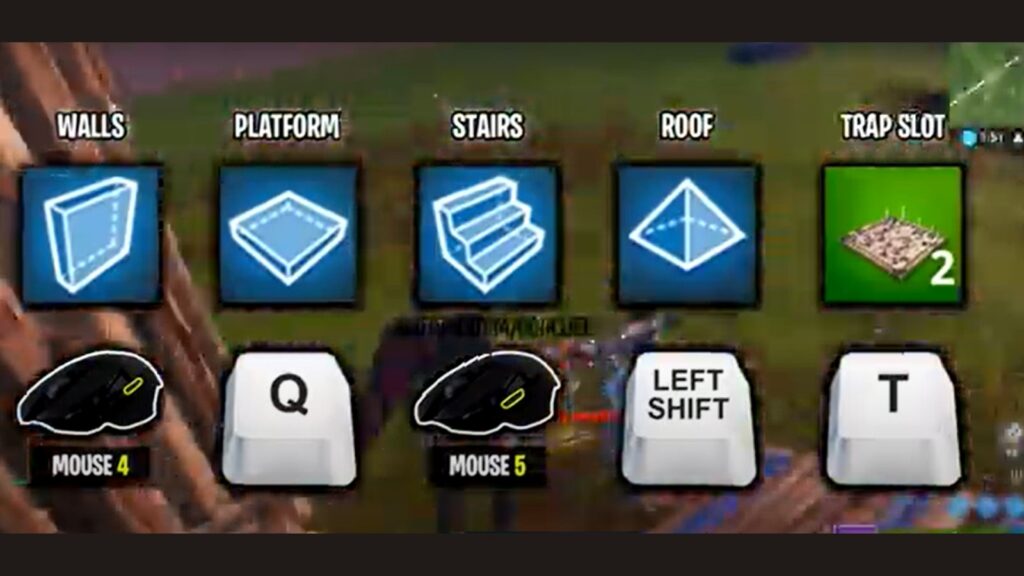
Lightning-Fast Building Controls
Building speed wins fights. These keybinds let you construct faster than opponents can react.
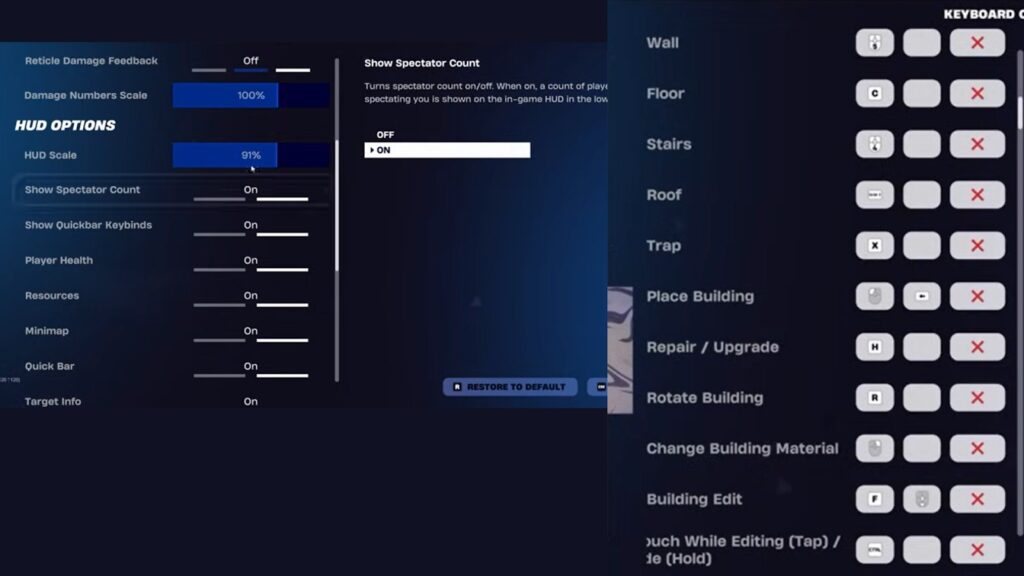
Wall: Mouse Button 4 – Your thumb rests naturally on this side button. Instant wall placement without moving fingers off WASD movement keys. Perfect for defensive building mid-fight.
Floor: Q key – Your pinky finger hits Q easily while other fingers stay on movement. Quick floor placement for high-ground pushes and defensive boxes.
Stairs: Mouse Button 5 – Second thumb button for ramp rushes. Both mouse buttons handle your two most important builds – walls and stairs for aggressive pushing.
Roof: L-Shift – Left shift works for pyramid builds. Not used as often as walls and stairs, so it gets a less accessible but still reachable key.
Building Edit: F key – Index finger drops down to F for structure edits. Close enough to movement keys that you can edit and move simultaneously.
Why this setup works: Your thumb handles instant defensive building. Your other fingers stay in movement. No awkward stretching or finger gymnastics during intense build fights.
Combat Keybinds for Quick Weapon Switching
Weapon switching speed determines who shoots first.
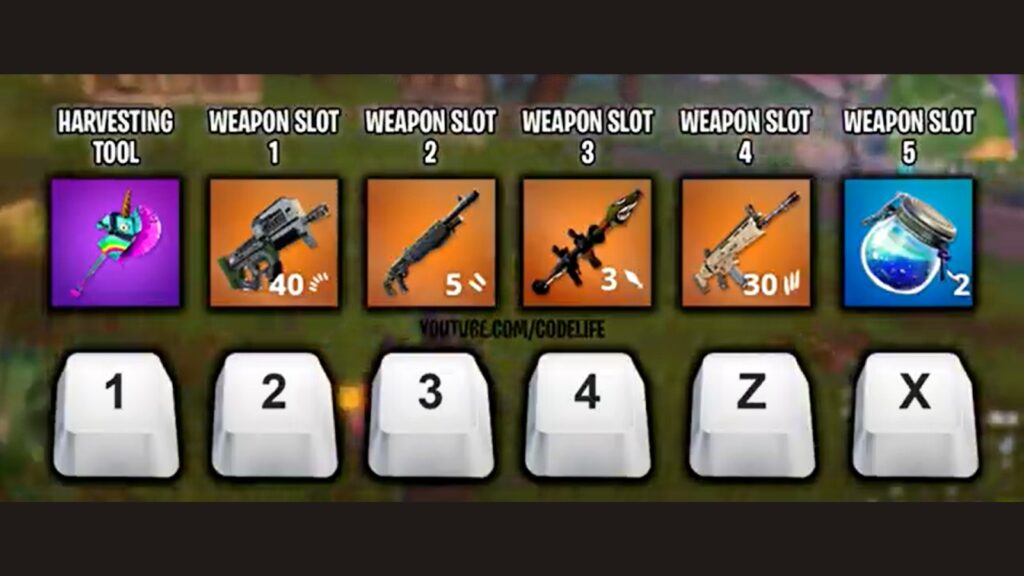
Weapon Slots: 2, 3, 4, Z, X – Numbers 2-4 for your main weapons. Z and X for utility items. Index finger handles 2-4 while ring and pinky hit Z and X.
Use/Interact: E key – Standard E for pickups and interactions. Index finger drops from D to E naturally. Easy reach without hand repositioning.
Harvesting Tool: 1 key – Pinky finger reaches 1 for pickaxe. Quick farming and material gathering without disrupting other finger positions.
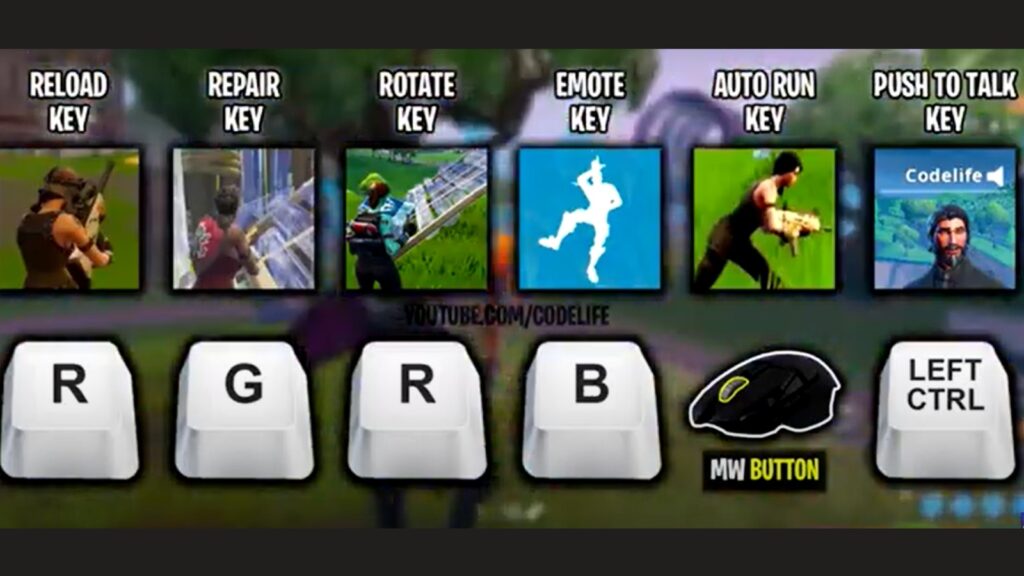
Reload/Rotate: R key – Single key with dual function. R reloads weapons and rotates building pieces. Smart efficiency that saves key bind space.
The logic here: Keep weapons on easily accessible keys. Put utility functions slightly further but still reachable. Priority goes to the actions you use most often.
Movement Controls
Movement is your foundation. Everything else builds on top of solid movement key binds.
Jump: Space Bar – The thumb hits the spacebar naturally. Never interfere with finger movement on WASD. Essential for building fights and dodging shots.
Crouch: C key – Ring finger drops to C for quick crouching. Instant defensive positioning when under fire. Close enough to movement that you can crouch-walk smoothly.
Sprint: L-Ctrl with Sprint by Default enabled – Left control for manual sprinting when needed. But Sprint by Default means you run automatically without holding any keys.
Why these movement choices work: Thumb and ring finger handle movement modifiers. Your index, middle, and ring fingers stay dedicated to WASD for consistent directional control.
The big picture: Every keybind serves speed. No wasted finger movements or awkward stretches. Your hands stay in a natural position while accessing every function you need for competitive play.
Graphics Settings for Competitive Edge
Graphics settings can give you an unfair advantage. While other players struggle with visual clutter, you’ll spot enemies clearly and maintain smooth performance.
Visual Optimization
Turn off anything that hides enemies or blocks your view.
Shadows: OFF – This is huge for competitive play. Shadows create dark spots where enemies can hide. With shadows disabled, you see everything. No more getting shot by someone hiding in a shadow you couldn’t see.
Anti-Aliasing: OFF – Makes edges look smoother but costs FPS. In fast-paced fights, you need every frame possible. Slightly jagged edges are worth the performance boost.
Effects: Low – Explosions, muzzle flashes, and particle effects look pretty but create visual noise. Low settings keep essential effects while removing distractions that block enemy visibility.
Post Processing: Low – Controls bloom, motion blur, and visual filters. The low setting keeps the game looking clean without unnecessary visual processing that can hide opponents.
The key principle: If a visual setting doesn’t help you spot enemies faster, turn it down or off.
Performance Settings
These settings maximize your competitive performance.
View Distance: Epic – Only setting you want on maximum. Epic view distance lets you spot enemies at long range before they see you. Essential for early game rotations and positioning.
Textures: Medium – Good balance between visual quality and performance. Medium textures keep the game looking decent without destroying your FPS in heated build fights.
Frame Rate Limit: 240-360 FPS – Set based on your monitor’s refresh rate. 240Hz monitor? Set 240 FPS limit. Higher FPS means smoother aim tracking and reduced input lag.
V-Sync: OFF – Creates input delay by syncing frames to your monitor. Every millisecond of delay matters in competitive play. Turn it off for maximum responsiveness.
Display Configuration
Your display setup affects everything else.
Resolution: 1920×1080 – Sweet spot for competitive gaming. Higher resolutions look prettier but cost massive FPS. 1080p gives you sharp visuals while maintaining high frame rates.
Window Mode: Fullscreen – Exclusive fullscreen mode gives best performance. Windowed or borderless modes create extra processing overhead. Fullscreen eliminates that waste.
Brightness: 121% – Brighter than default to see into dark corners and buildings. Many players hide in dark spots thinking they’re invisible. Higher brightness reveals them.
HUD Scale: 85% – Shrinks your interface elements to show more of the game world. A bigger field of view means better situational awareness. You’ll spot enemies sooner with less UI blocking your screen.
Why these specific numbers work: Every setting prioritizes enemy visibility and smooth performance over visual beauty. Competitive advantage beats pretty graphics every time.
Remember this: Your opponents might have fancier-looking games, but you’ll see them first and shoot them smoother. That’s how you win fights.
Troubleshooting Settings Issues
Settings don’t always work perfectly the first time. Here are the most common problems and exactly how to fix them.
Mouse Problems
Mouse issues ruin everything. If your aim feels off, start here.
Inconsistent aim – Your crosshair jumps around unpredictably. Check if mouse acceleration is turned on. Windows sometimes enables this automatically. Go to Mouse Settings → Additional mouse options → Pointer Options → Uncheck “Enhance pointer precision.”
Sensitivity feels wrong – Everything moves too fast or too slow, even with Ninja’s exact settings. Your DPI probably doesn’t match. Open your mouse software and verify it shows exactly 800 DPI. Some mice reset to default DPI after updates.
Building delays – You press mouse buttons but walls don’t appear instantly. Check your mouse button bindings in Fortnite. Make sure Mouse Button 4 shows “Wall” and Mouse Button 5 shows “Stairs.” Sometimes the game unbinds these randomly.
Tracking issues – Your crosshair skips or feels jerky during movement. Clean your mouse sensor with compressed air. Also, check your mouse pad – worn or dirty pads cause tracking problems. A quality cloth mouse pad fixes most tracking issues.
Performance Issues
Poor performance makes great settings useless.
Low FPS – The game runs choppy even with optimized graphics settings. Lower textures from Medium to Low, and effects from Low to Off. If still struggling, drop the resolution to 1600×900 temporarily until you upgrade the hardware.
Input lag – Delay between mouse movement and screen response. Double-check that V-Sync is disabled in Fortnite settings. Then enable Game Mode in Windows 10/11: Settings → Gaming → Game Mode → On.
Stuttering – The game freezes for split seconds during fights. Close Discord, Chrome, and other programs eating RAM. Also, update your graphics drivers – stuttering often comes from outdated drivers conflicting with game updates.
Keybind conflicts – Keys don’t work as expected or trigger multiple actions. Open your mouse software (Logitech G HUB, Razer Synapse, etc.) and check for duplicate bindings. Make sure Mouse Button 4 isn’t also bound to the keyboard key “4” – this confuses Fortnite.
Quick diagnosis trick: If multiple problems start at once, restart your computer first. Windows updates sometimes mess with gaming settings. A fresh restart fixes about 50% of sudden setting problems.
Still, having issues? Reset Fortnite to default settings, then reapply Ninja’s configuration step by step. Sometimes corrupted config files cause weird problems that only a full reset can fix.
The golden rule: Change one setting at a time when troubleshooting. If you change everything at once, you can’t tell which fix worked.
Conclusion
You now have the exact settings that helped Ninja dominate Fortnite with 15 daily wins. His 800 DPI mouse configuration, optimized keybinds, and performance-focused graphics aren’t just random choices – they’re the result of thousands of hours of competitive refinement.
Remember the key principles: Mouse buttons for building speed, shadows off for clear visibility, and consistent sensitivity ratios across all aiming scenarios. These settings provide the foundation, but your improvement depends on consistent practice.
Start with mouse settings first, then gradually implement the keybinds and graphics optimizations. Give yourself 1-2 weeks to fully adapt before making additional changes.
Don’t expect instant miracles – even with perfect settings, building skills takes time. But you now have the same technical foundation that helped make Ninja a legend.
Your competitive edge starts with these proven settings. Time to put them to work.
Frequently Asked Questions
Will copying Ninja’s settings instantly improve my aim?
Settings provide the foundation for improvement, but consistent practice and muscle memory development are required for actual skill gains.
Can I use these settings with a different mouse/keyboard?
Yes, but adjust DPI and keybinds based on your hardware capabilities. Core sensitivity ratios remain effective across equipment.
Should I change all settings at once?
No, implement gradually. Start with mouse settings, then keybinds, and finally graphics. Allow adaptation time between major changes.
Do these settings work for console players?
Limited application. Mouse sensitivity and graphics settings are PC-specific. Building keybinds concept applies but requires controller adaptation.
How long before I see improvement with these settings?
Initial comfort takes 3-5 days. Significant improvement appears after 1-2 weeks of consistent practice with proper settings.