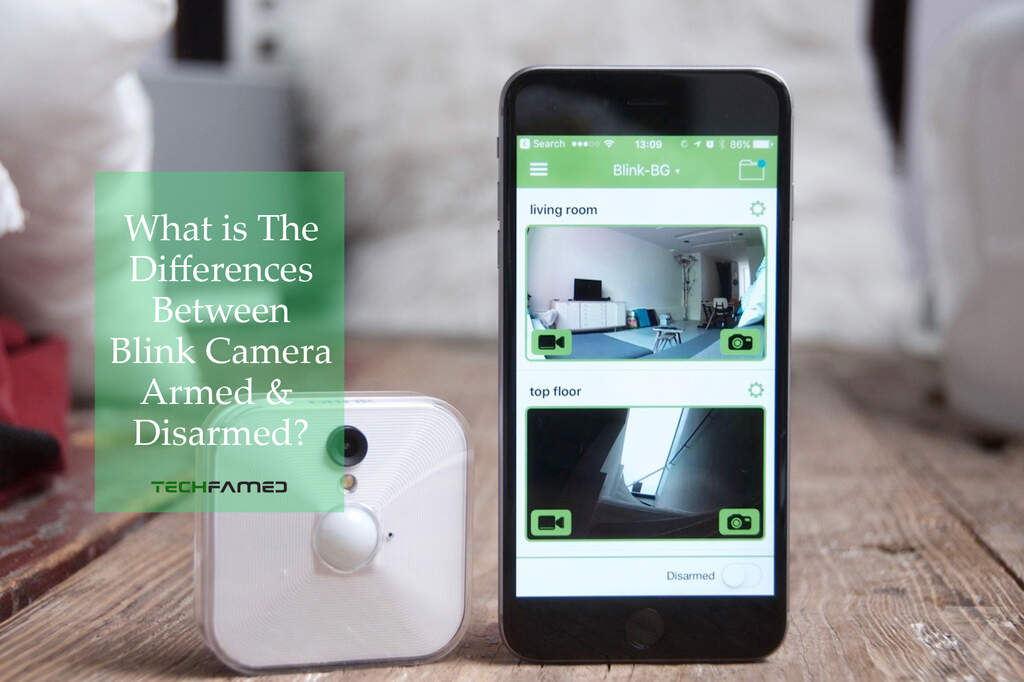
Beginner users may find it difficult to differentiate between blink armed vs disarmed. Honestly, this is nothing but allowing and disallowing some features in these security cameras. Indeed, blink is not a standard security device; it is a network of multiple cameras connected to a single Blink software.
Basically, blink camera arming and disarming is related to motion detection and motion-activated video recording. Both features have their own benefits. However, the blink system is kept on after disarming the device.
Users are allowed to armed or disarmed their blink cam according to need. However, you need to know a few more things to operate these features and how to handle if there is anything wrong that you are not aware of. So keep reading to all things about blink arming feature.
Brief Comparison Between Blink Armed vs Disarmed
When a user is armed with a blink camera, the device turns on motion detection and motion-activated video recording. So, live footage will be delivered to your blink software or phone whenever some movement is captured on the lens. The recording video will be saved for 60 days if your Blink app supports cloud storage. In most cases, blink cameras capture short 5-second video clips emailed or saved to your application.
In contrast, the disarmed mode in a blink camera means the cameras are temporarily turned off. In this mode, the camera lenses don’t record motion or send video messages to the owner’s app. This feature is beneficial when a user is home and doesn’t want to record unnecessary clips. However, users can access live view and two-way audio tabs whether the blinking camera is armed or disarmed.
|
Mode |
Motion alerts |
Motion video recording |
Live view |
Two way audio |
|
Armed |
Available |
Available |
Available |
Available |
|
Disarmed |
No |
No |
Available |
Available |
Blink XT or XT2 camera models allow cloud storage free for the users. However, you may need a subscription if your model is Blink Indoor, Outdoor, or Mini camera. Now you can arm or disarm your blink camera in various ways. You can use the Blink app, alexa voice commands, and other methods. So below are the steps to enable or disable the blink system and troubleshoot the common problems.
How to Arm My Blink Camera Manually?
Manually Arming your blink camera is relatively easier than you think. But first, you need to have an official Blink app. By visiting the official app, you can easily navigate the blink camera. So below are the steps to arm your blink cam.
- Open the Blink app on your phone or desktop
- Log in to your account using your username and password
- Scroll down and reach the bottom of the homepage
- Go to the bottom right corner
- Here you get two toggle switches for armed and disarmed
- Click on armed to enable the blink camera
How Can I Arm Only One Individual Camera?
Currently, there is no way to arm only individual blink cameras without simultaneously arming the entire system. However, you can disable alarm and motion detection alters on a single camera when armed. You can proceed with that feature by visiting the official Blink app. So follow the below steps to start
- Log in to your Blink application
- Go to three lines icon on the camera and click it
- Tap on the activity zones option
- Now you can disable alarm and motion detection alerts on certain cameras
Remember, each camera is divided into a 25-degree rectangle view. You can turn off a specific camera view with a simple toggle option. Additionally, you can set motion detection recording by 5 to 60 seconds. If you want fewer motion detection alerts, simply adjust the sensitivity by a 1-10 scale.
How to Arm and Disarm Blink Camera Automatically?
Manually arming or disarming the blinking camera may be time-consuming sometimes. So Instead of manual setting, you can automate the program by scheduling. Below are the steps to proceed.
- Open your Blink app and log in to your account.
- Scroll down and go to the bottom of the homepage.
- Click on the setting icon, and a new page will open.
- Select your blink system.
- Go to the time zone and tap on it
- Choose your scheduling option
- Scroll up and go to the top right corner
- Click on the plus sign
- Set your timetable schedule and save it
Following these steps, you can set many schedules to apply different blink cameras.
How Can I Arm Blink Cameras At Different Times?
Schedule the option if you want to arm blink cameras at different times. This feature allows specific time setting for each camera. Follow the below steps to proceed.
- Open the Blink app on your phone.
- Log in to your account and select your Blink system
- Go to the setting icon and tap on it
- Select your camera
- Go to timezone and select
- Make changes to the scheduling option
- Set timetable for specific cameras
How to Troubleshoot Common Blink Issues While Arming?
When you try to arm your blink camera, several problems may arise. But in most cases, the following steps will resolve the issues. So follow the steps below.
- Power cycle the blinking camera by removing and reinserting the batteries in between 30 seconds gap. The process will reboot the system and troubleshoot the issue.
- Reboot your modem by Unplugging and plugging in the modem wifi.
- Clear the app’s cache and disable the schedule option
- Uninstall and install the Blink app.
How to Fix if the Blink Camera Failed to Arm?
Blink camera failed to arm? Maybe there is a connection issue. Sometimes, a specific camera faces trouble connecting to a stable internet. On this occasion, resetting the modem or wifi is the best solution. So unplug the router and wait 30 seconds before the plugin. The process will reboot the device and make the connection secure.
How to Fix an Armed Blink Camera Not Recording Video?
Is the blink camera armed, but the video recording is not working? Maybe there is an error in motion detection settings. So open your Blink app and go to the settings page. Ensure the motion detection feature is turned on. Secondly, adjust the sensitivity of the motion and reboot the camera. Double-change the wifi connection and move your camera closer to the router. Follow these steps to troubleshoot the following issue.
How to Fix Blink Camera Keeps Disarming Itself?
The blink camera keeps disarming itself; maybe there is a wrong scheduling setting. To verify the configuration is correct and that the camera is armed. Secondly, ensure the strength of the internet connection. If not, restart your modem to stabilize the wifi connection. Now restart the blinking camera and remove the batteries from the device. Turn on the camera after a few minutes and ensure the disarming problem is resolved.
Conclusion
Remember, armed and disarmed refer to features that enable or disable motion detection alerts and video recordings. Users arm or disarm the feature according to their needs. Arming your blink camera enables the following functions, and disarming will turn off the features. There are several ways you change the camera setting. You can also use the Blink app, alexa voice command, and IFTTT. So go through our guide and make the desired changes to your blink camera.
If any of our reader new something better worth sharing to help blink owners, we welcome to contribute their opinion through technology write for us page.